Menu

Monday 24 June 2013

Top 5 Computer Programmers in the world


Here is List of world's Top 5 programmers around the world who changed computer era by developing computer software, programs and also operating system.

1. Dennis Ritchie

Dennis Ritchie (1941-2011) was an American Computer Programmer. Sir. Ritchie developed "C" programming language and co-developer of Unix Operating system. Dennis Ritchie worked for Alcatel-Lucent and for Bell labs.
- See more at: http://techsantra.blogspot.in/2013/06/top-5-computer-programmers-in-world.html#sthash.z7yQS6XZ.dpuf
Here is List of world's Top 5 programmers around the world who changed computer era by developing computer software, programs and also operating system.

1. Dennis Ritchie

Dennis Ritchie (1941-2011) was an American Computer Programmer. Sir. Ritchie developed "C" programming language and co-developer of Unix Operating system. Dennis Ritchie worked for Alcatel-Lucent and for Bell labs.

http://www.xda-developers.com/wp-content/uploads/2011/10/dennis_ritchie6.jpg

Dennis Ritchie changed digital era by creating "C" programming language. Lisp, Visual Basic, Pascal, COBOL, Turbo pascal 7.0, PL/1, ADA, these are the programming languages are written in C programming language. "C" is a best programming language for newbie programmers, Who are interested in learning codes. Dennis Ritchie and his colleague Ken Thompson received the Turing award for implementing and developing UNIX operating system in the year 1983. - See more at: http://techsantra.blogspot.in/2013/06/top-5-computer-programmers-in-world.html#sthash.z7yQS6XZ.dpuf
Dennis Ritchie changed digital era by creating "C" programming language. Lisp, Visual Basic, Pascal, COBOL, Turbo pascal 7.0, PL/1, ADA, these are the programming languages are written in C programming language. "C" is a best programming language for newbie programmers, Who are interested in learning codes. Dennis Ritchie and his colleague Ken Thompson received the Turing award for implementing and developing UNIX operating system in the year 1983.

2. Mark Zuckerberg
http://www.biography.com/imported/images/Biography/Images/Profiles/Z/Mark-Zuckerberg-507402-1-402.jpg

Mark Zuckerberg created Facebook.com when he was 20 years old, Mark and his Harward university friends helped to build Facebook. When Facebook started it was only available for Hardward students. Facebook website is mainly written in C++ and PHP programming language. Mark is very passionate about programming and codes, In his early age he created a messenger called "Zucknet" that allowed to chat with all computers. In 2003 Mark created Facemash, the website is all about comparing two Harward university students side by side "Hot or Not" contest. Some developers re-created Facemash (check here)http://facemash.com.au
In last year Mark Zuckerberg earned more than $2 billion worth stock. And worth $15B according to report of usnews.

3. Steve Wozniak

http://images.intomobile.com/wp-content/uploads/2011/04/steve_wozniak_steve_jobs11-660x465.jpg

  The Brain behind Apple Inc. -Steve Wozniak is an Computer scientist and Programmer. Steve Woz is well known for developing Apple-1 and Apple-2 :
In early 1976 Woz and Jobs developed a Hardware ,Circuit Board design and Operating system for Apple- 1 . Apple 1 priced around $666, And sold 50 system boards to Paul Terrell (Computer shop owner) . After Apple-1, Woz developed first Color graphics personal computer with Integer BASIC programming language and they named it as a Apple-2. For sometime Steve Wozniak was teaching elementary school students about computer. In 2006 Steve Woz published his autobiography iWoz: From Computer Geek to Cult Icon. Now Steve Woz is working for Fusion-io as a Chief Scientist

4. Bill Gates

http://bornstronger.com/userfiles/image/billgates.jpg

Bill Gates: Founder of world's largest software company Microsoft, And also Co-chairman of Gates Foundation. Also Bill gates is one of the world's richest man in the world. Bill started working with computer when he was 13 years old. When he was 17 Bill Gates formed a company called Traf-o-data. And In the age of 20 Bill Gates founded Microsoft Inc. Bill Gates also created MS-DOS Operating system and Windows OS. Currently Microsoft is one of the valuable company in the world. In 2012 Microsoft earns $73.72 Billion.

5. Linus Torvalds

http://25.media.tumblr.com/tumblr_mdlcix02BU1r8xaoio1_500.jpg

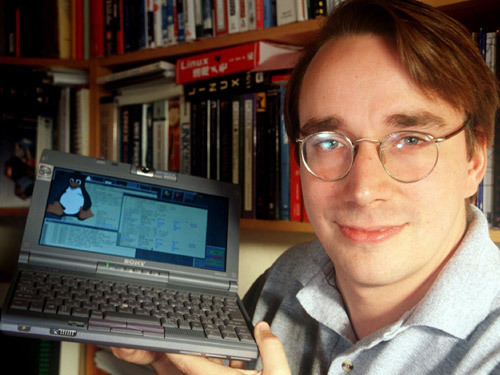
Linus Torvalds is a software engineer, hacker and project coordinator. In 1991 Linus Torvalds released Linux 0.11 which is written in C programming language. Linux supports more than 20+ platforms. And Linux is a free and open source operating system, Open source means that you can get the source code of the operating system for free. The Top 5 Programmers lists ends here according to our FOH|Team but there are thousands of best programmers are there Larry page, Brin sergy, Bjarne Stroustrup.
Dennis Ritchie changed digital era by creating "C" programming language. Lisp, Visual Basic, Pascal, COBOL, Turbo pascal 7.0, PL/1, ADA, these are the programming languages are written in C programming language. "C" is a best programming language for newbie programmers, Who are interested in learning codes. Dennis Ritchie and his colleague Ken Thompson received the Turing award for implementing and developing UNIX operating system in the year 1983. - See more at: http://techsantra.blogspot.in/2013/06/top-5-computer-programmers-in-world.html#sthash.z7yQS6XZ.dpuf

Here is List of world's Top 5 programmers around the world who changed computer era by developing computer software, programs and also operating system.

1. Dennis Ritchie

Dennis Ritchie (1941-2011) was an American Computer Programmer. Sir. Ritchie developed "C" programming language and co-developer of Unix Operating system. Dennis Ritchie worked for Alcatel-Lucent and for Bell labs.
- See more at: http://techsantra.blogspot.in/2013/06/top-5-computer-programmers-in-world.html#sthash.z7yQS6XZ.dpuf
Here is List of world's Top 5 programmers around the world who changed computer era by developing computer software, programs and also operating system.

1. Dennis Ritchie

Dennis Ritchie (1941-2011) was an American Computer Programmer. Sir. Ritchie developed "C" programming language and co-developer of Unix Operating system. Dennis Ritchie worked for Alcatel-Lucent and for Bell labs.
- See more at: http://techsantra.blogspot.in/2013/06/top-5-computer-programmers-in-world.html#sthash.z7yQS6XZ.dpuf


Friday 14 June 2013

Mumbai cops become victims of hacking; salary accounts compromised

Latest reports claim that unidentified miscreants have hacked into the salary accounts of many Mumbai Police personnel. Reportedly, there have been withdrawals from ATMs located in some other country – details of which remain unknown at the moment.

While there is no saying on the number of accounts that have been hacked in the incident, the police reportedly are in the process of filing an FIR. To delve deeper into the details, we got in touch with Senior Police Inspector Nandkishore More of BKC Cyber Crime Investigation Cell. More declined to say anything on the matter.

The Northern Hemisphere has the majority of hackers (Image credit: Getty Images)


They have also formed a team, led by a DCP, to investigate the episode. The bank too has been asked to look into the details and subsequently submit a report.

Worrying as it is, instances of hacking are a fairly common occurrence, but this particular instance is an indicator of the fact that miscreants are getting bolder with their targets each time.

A report by Akamai Technologies last month found that India stood in eighth place with 2.3 percent of the world's hacking attack traffic coming from our country during the fourth quarter of last year. India's share in the hacking space has decreased from 2.5 percent in the Q3 and 3 percent in comparison to the year-ago period.

Monday 6 February 2012

How to add Blogger's Read More function to customized templates

As announced yesterday, Blogger have now enabled selective post summaries for our blogs. This means we can add a "jump break" in our posts, after which any content will only be visible on item pages.

Those of us using customized templates will probably need to add the code required for this function to work. In this article, I'll explain how easy this is to implement, as well as some helpful hints for customizing the "Read More" link.

Will the "Read More" feature work for my customized template?

For most Blogger users, adding the code required for Blogger's post summaries will enable selective summaries without error, even if you've already added the code to summarize your posts using the <span class="readmore"> hack.

The only templates this method will not work with is those which have added an automatic post summaries hack, which summarizes the posts based on the number of characters or words. This is because such customizations ignore any code added to the body of our blog posts and don't register Blogger's Jump Links.

If you'd prefer to use Blogger's Read More function than your current automatic post summaries, the simplest way to adapt your template is to remove references to the post summaries script - anything between the <script> and </script> tags used for your particular method.

If in doubt, refer to the author of the particular version of this script you are using.

Sunday 29 January 2012

Download Windows 7 Theme “SevenVG RTM” for Windows XP


Hello everyone!

I'm very pleased to announce "SevenVG" theme which is the First and Best Windows 7 look-like theme for Windows XP and all other Windows 7 look-like themes available on net are based on it.
"SevenVG RTM" theme has been created for Windows XP users who want to get the same Windows 7 look in XP.
Following is a preview of this theme in action:

Download Link:
You can download the theme using following link:
Download SevenVG RTM Theme
Download Normal Thin Taskbar Version
Download Dark Black Version
Make Windows XP look-like Windows 7
How to Install and Use:
1. Once you download the ZIP file, extract it. You'll get a folder "SevenVG RTM Theme for Windows XP by Vishal Gupta".
2. In this folder, you'll get 5 more folders:
  • Extra Common Tasks (This folder contains 2 extra shell styles: Bottom and Left dark blue.)
  • Fonts (This folder contains Segoe UI fonts required for the theme. Run Fonts.exe file to install them.)
  • Iconized Taskbar Hack (This folder contains registry script to enable Iconized taskbar in Windows XP.)
  • Styler Toolbar (This folder contains "Styler" setup file and "SevenVG RTM" Styler skin. You can apply it to get Windows 7 look-like commandbar in Windows XP Explorer.) To know more about Styler and how to use it, visit this link.
  • Theme (This folder contains the main theme. Run Theme.exe file to install it.)
3. Download and run UXTheme patcher using following topic:
How to Install & Use Themes in Windows?
4. After running the above mentioned patcher, run "Theme.exe" file present in "Theme" folder and apply the theme using Desktop Properties.

Transform Windows XP into Windows 7 without using Customization Pack


Windows 7 provides lots of new features along with a newly designed interface. It looks very similar to Windows Vista but there are many GUI changes like redesigned taskbar, Explorer, new boot screen and login screen, etc.

If you are still using Windows XP but want to enjoy the new Windows 7 look, then this tutorial will definitely help you.
After following this tutorial, you'll get the same Windows 7 look in your Windows XP. Following is a list of things which are going to change after following this tutorial:
  • Windows Theme or Visual Style
  • Icons
  • Boot Screen
  • Login Screen or Welcome Screen
  • Sounds
  • Cursors
  • Taskbar
  • Wallpaper
  • Sidebar
  • Progress Dialog Box
  • Shutdown / Log off Dialog Box
  • About Windows Box
  • System Properties Dialog Box
  • Volume Control Window
  • Extras like "Aero Shake", "Aero Snap", "Aero Peek", "Calculator" and "Paint"
  • A Few Other Mods...
NOTE 1: If you want to download all BITMAPs, AVIs and other files mentioned in this tutorial in a single pack, you can download it using this link.
NOTE 2: Please create a Restore point using "System Restore" before applying anything mentioned in this tutorial so that you can restore your system back to default if you don't like the changes.
Also take a backup of system files before modifying them, so that you can restore them if anything goes wrong or you don't like the new change.
NOTE 3: If you are facing problems while saving a file after editing in resource hacker, then make sure you have disabled WFP (Windows File Protection) service using "WFP Patcher" or use "Replacer" to replace the file.
Also if you are getting error "Can't create file...", that means you have edited and saved the same file in past and there is a backup file which needs to be deleted before saving this file again. Go to the folder containing this file and you'll see a similar file having "_original" in its name. Delete it and try to save the file in resource hacker.
So here we start our transformation tour:
1. Windows Theme or Visual Style:
Windows 7 provides a new refreshing look which includes redesigned taskbar and start menu, Windows Explorer and a few other small changes.
You can get the same look in Windows XP by using following theme:

Download SevenVG RTM Theme for Windows XP
If you want a Black version, then you can get it using following link:

Download SevenVG Black RTM Theme for Windows XP
If you don't like the new Windows 7 Superbar, then you can download Normal Taskbar versions of these themes as well:
Download SevenVG RTM Theme with Normal Taskbar for Windows XP
Download SevenVG Black RTM Theme with Normal Taskbar for Windows XP
You can also use an excellent WindowBlinds skin created by "fediaFedia". It requires Stardock WindowBlinds to be installed in your system.
Download Windows 7 WindowBlinds Skin for Windows XP
2. Icons:
You can get Windows 7 icons in XP using "SevenVG Icon Pack":

Download SevenVG Icon Pack for IconTweaker
Download SevenVG Icon Pack for Icon Packager
3. Boot Screen:
Windows 7 contains a new animated boot screen which shows animated items/balls that come together to form Windows logo.
You can get a similar boot screen in Windows XP:

Download Windows 7 Boot Screen for Windows XP
4. Login Screen or Welcome Screen:
Windows 7 login screen looks similar to Vista login screen except the new background image and the text displayed at bottom.

Download Windows 7 Login Screen for Windows XP
5. Sounds:
Windows 7 sound scheme is similar to Windows Vista. You can download the whole pack from here:
Download Windows 7 Sounds
Just open "Sounds & Audio Devices" (mmsys.cpl) in Control Panel and goto "Sounds" tab and here you can replace windows default sounds with the new ones.
6. Cursors:
Windows 7 cursors are also similar to Vista which you can download using following link:
Download Cursors
7. Taskbar:
Windows 7 taskbar has been highly redesigned. It doesn't show opened program's name in their taskbar buttons, instead it only shows their icons. Also the taskbar buttons are a bit large in their size.

You can get the same behavior in XP by using following tutorial:
Get Windows 7 Iconized (Icon Only) Taskbar Feature in Windows XP
Or you can use following small utility which can do the task automatically:

Taskbar Iconizer: Utility to Iconize Taskbar in Windows XP
You can also use following tool to get Windows 7 look-like Superbar in XP:
ViGlance: Get Windows 7 Look-Like Superbar in Windows XP
Windows 7 taskbar also allows you to move taskbar buttons to change their positions, you can get the same feature in Windows XP by using "Taskbar Shuffle" utility:
Taskbar Shuffle: Move Taskbar and System Tray Buttons in Windows
And if you want to get the small "Show Desktop" rectangle at the end of Taskbar just like Windows 7, please visit following topic:
Get Windows 7 “Show Desktop” Taskbar Icon in Windows XP & Vista
8. Wallpaper:
You can get Windows 7 Desktop wallpaper using following link:
Download Wallpaper (via TheVista.Ru)
9. Sidebar:
Windows 7 comes with a cool Sidebar which is displayed on Desktop.

"joshoon" @ DA has ported the same Sidebar to XP which can be downloaded using following link:
Download Link
10. Progress Dialog Box:
Windows 7 progress dialog box is different from XP. But we can make our XP dialog box to look-a-like Windows 7 by using Resource Hacker.

Just open "%windir%\System32\Shell32.dll" file in Resource Hacker and then go to:
Dialog -> 1020 -> 1033
Now replace the existing code in right-side pane with the following code:
1020 DIALOGEX 20, 20, 237, 134
STYLE DS_FIXEDSYS | DS_MODALFRAME | DS_NOIDLEMSG | WS_MINIMIZEBOX | WS_POPUP | WS_CAPTION | WS_SYSMENU
EXSTYLE WS_EX_APPWINDOW
CAPTION ""
LANGUAGE LANG_ENGLISH, SUBLANG_ENGLISH_US
FONT 8, "MS SHELL DLG"
{
CONTROL "", 106, "SysAnimate32", ACS_TRANSPARENT | ACS_AUTOPLAY | ACS_TIMER | WS_CHILD | WS_VISIBLE, 65532, 0, 236, 25
CONTROL "Location:", 0, STATIC, SS_LEFT | WS_CHILD | WS_VISIBLE | WS_GROUP, 10, 30, 31, 10
CONTROL "", 103, STATIC, SS_LEFT | SS_NOPREFIX | WS_CHILD | WS_VISIBLE, 70, 30, 155, 10
CONTROL "File name:", 0, STATIC, SS_LEFT | WS_CHILD | WS_VISIBLE | WS_GROUP, 10, 45, 33, 10
CONTROL "", 102, STATIC, SS_LEFT | SS_NOPREFIX | WS_CHILD | WS_VISIBLE, 70, 45, 155, 10
CONTROL "Time remaining: About", 0, STATIC, SS_LEFT | WS_CHILD | WS_VISIBLE | WS_GROUP, 10, 60, 83, 10
CONTROL "", 105, STATIC, SS_LEFT | SS_NOPREFIX | WS_CHILD | WS_VISIBLE, 93, 60, 155, 10
CONTROL "Speed: 10.2 MB/sec", 0, STATIC, SS_LEFT | WS_CHILD | WS_VISIBLE | WS_GROUP, 10, 73, 103, 10
CONTROL "", 104, "msctls_progress32", PBS_SMOOTH | WS_CHILD | WS_VISIBLE, 10, 88, 217, 10
CONTROL 404, 0, STATIC, SS_BITMAP | WS_CHILD | WS_VISIBLE | WS_CLIPSIBLINGS | WS_GROUP, 65530, 107, 267, 28
CONTROL "Cancel", 2, BUTTON, BS_DEFPUSHBUTTON | WS_CHILD | WS_VISIBLE, 177, 113, 50, 16
}
Click on Compile Script button.
You'll also have to replace existing AVIs in the file with new ones. Just download following ZIP file and extract it:
Download AVIs and BMP
After extracting the ZIP file you'll get 3 AVI files and 1 BMP file. Replace existing AVIs in shell32.dll file with these new ones in following manner:
AVI -> 160 ->1033 with 160.avi
AVI -> 161 ->1033
with 161.avi
AVI -> 162 ->1033 with 162.avi
AVI -> 163 ->1033 with 162.avi
AVI -> 164 ->1033 with 162.avi
Now add the 404.bmp file at 404 location in file. Just click on Action -> Add a new resource and then click on Open file with new resource button. Select the downloaded BMP file and click on Open. Now in Resource Name enter 404 and in Resource Language enter 1033 and click on Add Resource button. That's it.
11. Shutdown / Log off Dialog Box:
Windows 7, similar to Vista, doesn't have any shutdown / log off dialog box but we can redesign Windows XP default shutdown box to make it more refreshing like following screenshot:

Download required BMP files from here:
Download Shutdown BMPs
Extract the file and you'll get 4 BMPs with the name:
1.bmp
2.bmp
3.bmp
4.bmp

Now open "%windir%\System32\Shell32.dll" file in Resource Hacker and then replace following BITMAPs with the mentioned BMP files:
Bitmap -> 14351 -> 1033 with 1.bmp
Bitmap -> 14353 -> 1033 with 2.bmp
Bitmap -> 14354 -> 1033 with 1.bmp
Bitmap -> 14355 -> 1033 with 2.bmp
Bitmap -> 14356 -> 1033 with 3.bmp
now save the file and open %windir%\System32\msgina.dll file in Resource Hacker and then replace following BITMAPs with the mentioned BMP files:
Bitmap -> 20140 -> 1033 with 1.bmp
Bitmap -> 20141 -> 1033 with 2.bmp
Bitmap -> 20142 -> 1033 with 1.bmp
Bitmap -> 20143 -> 1033 with 2.bmp
Bitmap -> 20150 -> 1033 with 4.bmp
Now save the file.
12. About Windows Box:
To change the About Windows box you'll need to change 2 things: The top logo and the text part.

Download the required BITMAP file from here:
Download About Windows BMP
Open "%windir%\System32\Shell32.dll" file in Resource Hacker and then replace following BITMAPs with the downloaded BMP file:
Bitmap -> 131 -> 1033 (For XP Professional)
Bitmap -> 147 -> 1033 (For XP Home)
Now open %windir%\System32\msgina.dll file in Resource Hacker and then replace following BITMAPs with the downloaded BMP file:
Bitmap -> 101 -> 1033 (For XP Professional)
Bitmap -> 107 -> 1033 (For XP Professional)
Bitmap -> 128 -> 1033 (For XP Home)
Bitmap -> 129 -> 1033 (For XP Home)
Now to change the text of dialog box, open "%windir%\System32\xpsp1res.dll" file in Resource Hacker and then goto:
Dialog -> 14352 -> 1033
Now replace the existing code in right-side pane with the following code:
14352 DIALOGEX 20, 20, 275, 198
STYLE DS_FIXEDSYS | DS_MODALFRAME | WS_POPUP | WS_CAPTION | WS_SYSMENU
CAPTION "About %s"
LANGUAGE LANG_ENGLISH, SUBLANG_ENGLISH_US
FONT 8, "MS Shell Dlg"
{
CONTROL 0, 12297, STATIC, SS_ICON | WS_CHILD | WS_VISIBLE, 7, 55, 21, 20
CONTROL "Microsoft %s", 13568, STATIC, SS_LEFTNOWORDWRAP | SS_NOPREFIX | WS_CHILD | WS_VISIBLE, 35, 55, 200, 10
CONTROL "Copyright (c) 2009 Microsoft Corporation. All rights reserved.", 13578, STATIC, SS_LEFT | SS_NOPREFIX | WS_CHILD | WS_VISIBLE, 35, 75, 210, 10
CONTROL "", 13581, STATIC, SS_LEFT | SS_NOPREFIX | WS_CHILD | WS_VISIBLE, 35, 85, 180, 20
CONTROL "This product is licensed under the Microsoft Software License Terms to:", 13586, "SysLink", 0x50000000, 35, 105, 180, 20
CONTROL "user name", 13575, STATIC, SS_LEFT | SS_NOPREFIX | WS_CHILD | WS_VISIBLE, 45, 125, 180, 10
CONTROL "org name", 13576, STATIC, SS_LEFT | SS_NOPREFIX | WS_CHILD | WS_VISIBLE, 45, 135, 180, 10
CONTROL "", 13095, STATIC, SS_ETCHEDHORZ | WS_CHILD | WS_VISIBLE, 35, 147, 235, 1
CONTROL "Physical memory available to Windows:", 13570, STATIC, SS_LEFT | SS_NOPREFIX | WS_CHILD | WS_VISIBLE, 35, 152, 133, 10
CONTROL "", 13571, STATIC, SS_LEFT | SS_NOPREFIX | WS_CHILD | WS_VISIBLE, 170, 152, 88, 10
CONTROL "OK", 1, BUTTON, BS_DEFPUSHBUTTON | WS_CHILD | WS_VISIBLE | WS_TABSTOP, 220, 178, 50, 14
CONTROL "Version 6.1", 0, STATIC, SS_LEFTNOWORDWRAP | SS_NOPREFIX | WS_CHILD | WS_VISIBLE, 35, 65, 235, 10
}
Click on Compile Script button and save the file.
13. System Properties Dialog Box:
To make System Properties dialog box look like Windows 7 one, visit following tutorial:

Get Windows 7 System Properties Dialog Box in Windows XP
14. Volume Control Window:
Windows 7 contains a redesigned Volume Control window which shows better details and graphics for device volumes. Now you can get a similar window in your XP.

Get Windows 7 Volume Control Box in Windows XP
15. A Few Extras:
Windows 7 provides 3 new features which are called "Aero Shake", "Aero Snap" and "Aero Peek".
"Aero Shake" is quite useful. Suppose you have more than one windows opened and you want to minimize all other windows except the window which you are working on, then you have to simply shake the current window with your mouse and all other windows will be minimized automatically. Shake it again and all minimized windows will be maximized again.
Using "Aero Snap", you can minimize, maximize, resize windows by just dragging-dropping them to the screen corners.
"Aero Peek" has replaced the old "Show Desktop" button. It can be found as a small rectangle present at the end of Windows 7 taskbar. When you hover the mouse cursor over it, it allows you to peek behind all open windows by hiding all windows and showing only outlines of all windows.
There are several 3rd party software available to provide these features in Windows XP. You can find them at following link:
Ultimate Collection of Free Tools to Get Windows 7's Aero Snap, Aero Shake and Aero Peek Features in XP
Windows 7 also contains a new redesigned Calculator which has new GUI and new options.

You can get the same calculator in Windows XP using following link:
Get Windows 7 Like Calculator in Windows XP
Windows 7 contains re-designed "MSPaint" program which provides Ribbons interface. You can get a similar MSPaint program in Windows XP:

Get Windows 7 Look Like Paint in Windows XP and Vista
16. A Few Other Mods:
1. Windows 7 Desktop context menu is much different than XP one.

Following are a few things which are new in Windows 7 menu:
  • "View" menu visible in Desktop context menu
  • "Arrange Icons By" renamed to "Sort by"
  • "Properties" renamed to "Personalize"
  • "Auto arrange icons" and "Align icons to grid" options moved from "Sort by" menu to "View" menu
  • 2 new options "Screen resolution" and "Gadgets" added to the menu
So above are a few changes which are new in Windows 7 but we can get them in XP using following tutorial:
Get Windows 7 Desktop Context Menu in Windows XP
2. Windows 7's Programs menu is similar to Vista but very different from XP, you can use following tutorial to make your XP Programs menu similar to Windows 7:
Change Look-n-Feel of Windows XP Start Menu
3. In Windows 7 explorer, A small status bar is displayed under each drive icon showing the filled and free space in the drive.

You can also do the same in XP by using a 3rd party utility:
Download Vista Drive Status for XP
Just run the file and it'll add the status bar for each drive.
4. To get the Breadcrumbs in addressbar you can use "QT Addressbar":

QT Addressbar: Windows 7 Addressbar Clone for Windows XP
5. In Windows 7 whenever you hover your mouse cursor over a Desktop icon, it shows a cool transparent rectangle over the icon. You can get the same effect in XP using following tool:
Vista_7_Icon_Mouse_Hover_Rectangle.png
Get Windows Vista and 7’s Desktop Icon Mouse Hover Effect in Windows XP
6. In Windows 7 when you press Alt-Tab to switch between opened applications, a glassy switcher screen is displayed which shows thumbnails of all running applications. You can get similar feature in Windows XP using following tool:
VistaSwitcher: The Best FREE Windows Alt-Tab Feature Replacement
That's all for now. After following all the above mentioned steps, you'll get Windows 7 look-n-feel in Windows XP.

Transform Windows 7 into Windows 8 (vNext) without using Customization Pack


NOTE: Please create a Restore point using "System Restore" before applying anything mentioned in this tutorial so that you can restore your system back to default if you don't like the changes.

After following this tutorial, you'll get the same Windows 8 look in your Windows 7. Following is a list of things which are going to change after following this tutorial:
  • Windows Theme or Visual Style
  • Icons
  • Boot Screen
  • Login Screen or Welcome Screen
  • Start ORB or Start Button
  • Sounds
  • Cursors
  • Ribbon UI in Windows Explorer
  • Start Screen with Live Tiles
  • Wallpaper
  • User Picture Tile in Taskbar
  • Aero Auto-Colorization Feature
  • Centered Titlebar text, icon and Up Button in Windows Explorer
  • Windows 8 Watermark on Desktop
  • Extras
So without wasting time, lets start the tutorial:
Windows Theme or Visual Style
Recent Windows 8 builds have featured a new Aero Lite theme. We have shared lots of themes for Windows 7 which provide similar UI.
Windows_8_Theme_Windows_7.png
You can download your desired one using following topics:
Icons
Currently Windows 8 icons are same as Windows 7. We'll update this section as soon as Windows 8 comes with new icons.
Boot Screen
You can get lots of cool Windows 8 metro boot screens for Windows 7 using following links:

Login Screen or Welcome Screen
Windows 8 login screen looks very simple and doesn't provide any eye candy effects as shown in following screenshot:

To get Windows 8 login screen in Windows 7, check out following article:
Download Windows 8 Login Screen for Windows 7
To get the date and time on login screen, check following topic:
Download Windows 8 Metro Logon Clock Screensaver
You can also check following awesome Windows 8 concept login screen for Windows 7:
Download Windows 8 Concept Login Screen “Gloosh” for Windows 7
Start ORB or Start Button
Windows 8 comes with a new start button:

You can get this Start button in Windows 7 using following tutorial:
Get New Leaked Windows 8 Start ORB (Start Button) in Windows 7
Sounds
Currently Windows 8 sound scheme is same as Windows 7. We'll update this section as soon as Windows 8 comes with new sound scheme.
Cursors
Currently Windows 8 cursors are same as Windows 7. We'll update this section as soon as Windows 8 comes with new cursors.
Ribbon UI in Windows Explorer
Windows 8 also features Office 2010 Ribbon UI in Windows Explorer. You can get the Ribbon UI in Windows 7 Explorer using following article:

Get Windows 8 Look-Like Ribbon UI in Windows XP, Vista and 7 Explorer using Styler Skin
Start Screen with Live Tiles
Microsoft has featured a new Start Screen in Windows 8 which looks similar to Windows Phone 7 home screen. It basically shows live tiles of the installed programs in Windows 8.
Windows_8_Start_Screen.png
You can get it in Windows 7 using following articles:
Wallpaper
You can download some cool Windows 8 wallpapers using following links:

User Picture Tile in Taskbar
Microsoft has integrated Windows Live service in Windows 8 shell. Now Windows 8 shows user picture tile in Taskbar notification area.

You can get it in Windows 7 using following topics:
Aero Auto-Colorization Feature
One of the most interesting feature of Windows 8 is "Aero Auto-Colorization" which is the ability to automatically configure the color of Aero elements, like the Start Menu, Windows Explorer windows, and the taskbar based on the desktop wallpaper.

You can get the same effect in Windows 7 using following free tools:
Centered Titlebar text, icon and Up Button in Windows Explorer
Windows 8 Explorer comes with good old "Up" button in toolbar. The Explorer window also shows titlebar text along with icon in center.
Official_Windows_8_Screenshot.png
Windows 8 Shows Centered Titlebar Text, Icon and New Up Button in Explorer
You can get the same in Windows 7 using following tutorial:
How to Get Windows 8 "Up" Button and Titlebar Text in Windows Vista and 7 Explorer?
Windows 8 Watermark on Desktop
Watermark aka Windows build number is shown at the right-bottom of Desktop in Windows testing builds. You can get Windows 8 watermark in Windows 7 using following topic:

How to Show Windows 8 Watermark (Build Number Info) on Windows 7 Desktop?

How to Reset / Remove / Bypass a BIOS or CMOS Password?


BIOS passwords are used to add some extra security to computers. You can either set a password to prevent access to BIOS settings or to prevent PC from booting. But sometimes this extra security might become a pain when you forget the BIOS password or someone changes your system BIOS password intentionally.
But there is no need to worry. There are many known ways to reset / remove / bypass the password:
  • By removing CMOS battery
  • By using motherboard jumper
  • By using MS DOS command
  • By using software
  • By using Backdoor BIOS password
Now I'll try to explain each method one by one:
DISCLAIMER: This information is intended for experienced users. It is not intended for basic users, hackers, or computer thieves. Please do not try any of following procedures if you are not familiar with computer hardware. We'll not be responsible for the use or misuse of this information, including personal injury, loss of data or hardware damage. So use it at your own risk.
By Removing CMOS Battery:
CMOS_Battery.jpg
Almost all motherboards use a small coin sized CMOS battery to store all BIOS settings along with the password. To reset the password, unplug the PC, open the cabinet and remove the CMOS battery for approx. 15-30 minutes and then put it back. It'll reset all BIOS settings as well as the password and you'll need to re-enter all settings.
If it fails, then try to remove the battery for at least one hour.
By Using Motherboard Jumper:
Almost all motherboards contain a jumper that can clear all CMOS settings along with the BIOS password. The location of this jumper varies depending upon the motherboard brand. You should read your motherboard manual to check its location. If you don't have the manual then look for the jumpers near the CMOS battery. Most of the manufacturer label the jumper as CLR, CLEAR, CLEAR CMOS, etc.
When you find the jumper, look carefully. There will be 3 pins and the jumper will be joining the center pin to either left or right pin. What you need to do, is remove the jumper and join the center pin to the opposite pin. e.g. if the jumper joins center pin to left pin, then remove it and join center pin to right pin. Now wait for a few seconds and then again remove the jumper and join the center pin to left pin.
Make sure to turn the PC off before opening the cabinet and resetting the jumper.
By Using MS DOS Command:
This method works only if you have access to the system when its turned on because this method requires MS DOS. Open Command Prompt from Programs menu and provide following commands one bye one:
debug
o 70 2E
o 71 FF
quit
NOTE: The first character in the above commands is English alphabet "o" and not the number 0.
After providing the above commands, restart your system and it should reset the CMOS Settings along with the BIOS password.
If you are curious to know how it works? then let me explain the above commands:
In this method we are using the Debug tool of MS DOS. The "o" character present at first in these commands, outputs the values to IO ports. The number 70 and 71 are port numbers which are used to access CMOS memory. By providing FF value we are telling CMOS that there is an invalid checksum and it resets the CMOS settings as well as BIOS password.
By Using Software:
There are a few software which can also reset CMOS settings or BIOS password or both within a few clicks. But as stated above you should have access to a system which is turned on and should have access to MS DOS or MS Windows:
CmosPwd
KillCMOS
By Using Backdoor BIOS Password:
Some BIOS manufacturer put a backdoor password in BIOS which always works irrespective of what password you have set in BIOS. Its a master password which is used for testing and troubleshooting purposes.
AMI BIOS Passwords:
A.M.I.
AAAMMMIII
AMI?SW
AMI_SW
AMI
BIOS
CONDO
HEWITT RAND
LKWPETER
MI
Oder
PASSWORD
AWARD BIOS Passwords:
01322222
589589
589721
595595
598598
ALFAROME
ALLy
aLLy
aLLY
ALLY
aPAf
_award
award
AWARD_SW
AWARD?SW
AWARD SW
AWARD PW
AWKWARD
awkward
BIOSTAR
CONCAT
CONDO
Condo
d8on
djonet
HLT
J64
J256
J262
j332
j322
KDD
Lkwpeter
LKWPETER
PINT
pint
SER
SKY_FOX
SYXZ
syxz
shift + syxz
TTPTHA
ZAAADA
ZBAAACA
ZJAAADC
PHOENIX BIOS Passwords:
BIOS
CMOS
phoenix
PHOENIX
Misc Common Passwords:
ALFAROME
BIOSTAR
biostar
biosstar
CMOS
cmos
LKWPETER
lkwpeter
setup
SETUP
Syxz
Wodj
Other Manufacturer BIOS Passwords:
Biostar - Biostar
Compaq - Compaq
Dell - Dell
Enox - xo11nE
Epox - central
Freetech - Posterie
IWill - iwill
Jetway - spooml
Packard Bell - bell9
QDI - QDI
Siemens - SKY_FOX
TMC - BIGO
Toshiba - Toshiba
VOBIS & IBM - merlin
NOTE: All these passwords are case-sensitive and are changed from time to time by manufacturers.
Other similar articles that may interest you

Friday 18 November 2011

How To Shutdown or Restart Computer With a Shortcut icon : Shutdown Batch File


Step : 1 ==>> Create a Notpad file

Step : 2 ==>> Write this code in Notpad file for SHUTDOWN :

                        c:\windows\system32\shutdown -s -f -t 1000

Where:  s = Shutdown
              f = Force Shutdown
              t = Time

Step : 3 ==>> save this file as name.bat and double click the file to make the shutdown.

Step 4: ==>> Write this code in Notpad file for RESTART :

                       c:\windows\system32\shutdown -r -f -t 1000

Wednesday 16 November 2011

How To Install Windows 7/Vista From USB Drive : Make Pan Drive Bootable

Requirements:

*USB Flash Drive (Minimum 4GB)
*Windows 7 or Vista installation files.
Follow the below steps to create bootable Windows 7/Vista USB drive using which you can install Windows 7/Vista easily.
1. Plug-in your USB flash drive to USB port and move all the contents from USB drive to a safe location on your system.
2. Open Command Prompt with admin rights. Use any of the below methods to open Command Prompt with admin rights.
*Type cmd in Start menu search box and hit Ctrl+ Shift+ Enter.
Or
*Go to Start menu > All programs > Accessories, right click on Command Prompt and select Run as administrator.
3. You need to know about the USB drive a little bit. Type in the following commands in the command prompt:

First type DISKPART and hit enter to see the below message.


Bootable USB Drive

Next type LIST DISK command and note down the Disk number (ex: Disk 1) of your USB flash drive. In the below screenshot my Flash Drive Disk no is Disk 1.
4. Next type all the below commands one by one. Here I assume that your disk drive no is “Disk 1”.If you have Disk 2 as your USB flash drive then use Disk 2.Refer the above step to confirm it.
So below are the commands you need to type and execute one by one:
SELECT DISK 1
CLEAN
CREATE PARTITION PRIMARY
SELECT PARTITION 1
ACTIVE
FORMAT FS=NTFS
(Format process may take few seconds)
ASSIGN
EXIT

Don’t close the command prompt as we need to execute one more command at the next step. Just minimize it.
Bootable USB Drive

5. Next insert your Windows7/Vista DVD into the optical drive and check the drive letter of the DVD drive. In this guide I will assume that your DVD drive letter is “D” and USB drive letter is “H” (open my computer to know about it).
6. Maximize the minimized Command Prompt in the 4th step.Type  the following command now:
D: CD BOOT and hit enter.Where “D” is your DVD drive letter.
CD BOOT and hit enter to see the below message.
7. Type another command given below to update the USB drive with BOOTMGR compatible code.
 BOOTSECT.EXE /NT60 H:

14

Where “H” is your USB drive letter. Once you enter the above command you will see the below message.
8. Copy your Windows 7/Vista DVD contents to the USB flash drive.
9. Your USB drive is ready to boot and install Windows 7/Vista. Only thing you need to change the boot priority at the BIOS to USB from the HDD or CD ROM drive. I won’t explain it as it’s just the matter the changing the boot priority or enabling the USB boot option in the BIOS.